Filed under: Uncategorized
Inspired by strobist.com…
This took a looong time! This was probably 15th time I changed the water. The first drop was colored, the second was not. There was about 1 second delay between the two drops, so that the first one had some time to make the purtey pattern in the water
Well this was fun… let’s go sleep now!
Color water drops in a vase.
strobist: sb28 @ 1/16 power with Double cut of CTO fired at a wall behind the vase.
f8 @ 1/125
Filed under: Photo/Video, tutorial | Tags: cactus triggers, diy, Ebay triggers, ml l3, nikon, pt04tm, remote, remote flash trigger, remote shutter, universal remote
After dishing out my life savings on the D90 and a set of 3 flashes I’m looking into all possible ways to DIY and squeeze the most amount of green juice from the stuff I buy to complete the rig.
Here are some tips on:
1. Making your $35 ebay triggers go a long way… literally… by adding an antenna for 0.001 cents…
2. Dusting off your old universal remote to trigger a Nikon camera…
FLASH TRIGGERS…
I bought a set of 3 receivers and a trigger for my flashes so that I can do a little strobist action. Check out STROBIST
They cost me 35 – 40 bucks. Travelled half a way around the globe from HK, and after 2 weeks, and a little mod I have PocketWizard(ish) quality triggers.
These PT-04TM triggers come with a little hole on the circuit board so you can solder a piece of wire into and extend the range exponentially… HOW CONVENIENT!!!
I don’t think the length of the wire matters ALL THAT MUCH, but I’m sure it does. I used a 6 inch piece of 18 gauge solid core hookup wire you can get at radioshack. Made a little hole in the top of the reciever for the wire go through, and bent the wire so I don’t poke my eye out with it. That’s it! DONE… saved 500 bucks
THE truly UNIVERSAL REMOTE
I had an old remote lying around and I read online that people had success using these to trigger their Nikon cameras, since they use IR for that purpose. Well, I tried to find the code so I can program my RCA RCR311W remote, but I couldn’t find it. I went through the code list and randomly tried different codes for about two hours and then finally… POP! YES! I FOUND IT!… Wait… which code was THAT? UGHHH… oh well… it works so that’s what counts…
3 months later I need to take a photo of myself across the street with noone to help me and I go for my trusty ‘ol UNIVERSAL remote, just to find that it reprogrammed itself since it had no batteries inside… OH NO!!! I can’t go through 2 hours of this again… I tried finding the code list again… can’t find it… perfect… just my life…
I’m a persistent sob so I got a hold of the manual for the remote online. I used the AUTO PROGRAMMING FEATURE, where the remote sends the codes it knows in 10 code batches until your camera triggers. Works like a charm! It takes… 2 minutes tops!
For this particular model…
1. Set your camera to remote triggering…
2. On the universal remote, press and hold TV button (ON OFF key turns on and remains on)
3. While still holding the TV button press the ON OFF until the ON OFF stays lit…
We are now in programming mode. Point the remote at the camera so that the remote can “see” the IR sensor.
4. Press PLAY button. The remote will send 10 codes from its memory while the ON OFF is blinking. After it’s done (about 5-6 sec) the ON OFF button will be lit solid again. Repeat pressing PLAY until you finally trigger the camera.
Wait you’re not done… in that last batch of 10 codes is the right code…
5. Press REVERSE to get to that code. The remote will go back through the codes one by one, each time you press REVERSE. When the camera triggers again, you’re on the right code! YOU GOT IT! (If you mess up and go one too far… just press FORWARD)
6. Press STOP and that saves that code into the memory.
Test your newly reclaimed universal remote by pressing ON OFF and the camera should trigger again. Give yourself a pat of the shoulder since you just saved 20 bucks!
What’s great about this is that this should work on any universal remote. It doesn’t matter what the actual code is… as long as your remote has the automated code testing feature… and most of them do! Dig into that manual and you could be triggering your Nikon from far far away…
I’m probably annoying people at Nikon right now… oh well… Thanks for the great camera, but I think I can use my own UNIVERSAL remote…
Filed under: Photo/Video | Tags: arduino, bogen, code, diy, nikon d90, stabilizer, steadicam, xbee
I added a Bogen 357 Quick Release Plate. Plus I’m working on a remote follow focus using a servo with arduino’s and xbee’s. WHAAAT?
This is the code for the sending arduino with the potentiometer
// SENDER
#define sensorPin 0 // analog pin 0 used to connect the potentiometer
#define threshold 0 // threshold for sending out values
int val; // variable to read the value from the analog pin
int lastSensorReading = 0;
void setup()
{
// start serial port at 19200 bps
Serial.begin(9600);
}
void loop()
{
char sensorValue = readSensor();
if (sensorValue > 0){
Serial.print(sensorValue, DEC); // print the value
Serial.print("\r");
delay(20);
}
}
char readSensor(){
char message = 0;
int sensorReading = analogRead(sensorPin);
sensorReading = map(sensorReading, 0, 1023, 0, 179); // scale it to use it with the servo (value between 0 and 180)
if (abs(sensorReading - lastSensorReading) > threshold) {
message = sensorReading;
lastSensorReading = sensorReading;
}
return message;
}
// End Sender
This is the code for the receiving arduino with the servo’
// RECIEVER
int val;
int inByte= 0;
char inString[6];
int stringPos = 0;
#include
Servo myservo; // create servo object to control a servo
void setup() {
// start serial port at 19200 bps
Serial.begin(9600);
Serial.println("Ready!");
myservo.attach(9); // attaches the servo on pin 9 to the servo object
}
void loop() {
if (Serial.available() > 0) { // are there any bytes available on the serial port ???
handleSerial();
}
}
//------------
void handleSerial() {
inByte = Serial.read();
if ((inByte >= '0') && (inByte <= '9')) {
inString[stringPos] = inByte;
stringPos++;
}
if (inByte =='\r') {
int val = atoi(inString);
Serial.println(val);
myservo.write(val); // sets the servo position according to the scaled value
delay(15);
for (int c = 0; c < stringPos; c++) {
inString[c] = 0;
}
}
}
//------------
// End Reciever
Took the camera with the steadicam to the park to get some test footage, and stumbled upon a game of good ol’ baseb-ol’
It was a bit windy and I think I still need to teak the weights a bit because the rig kept spinning a bit. Maybe it’s a problem with the bearing not being 137% in the center. I’ll have to check that out.
In the meantime, you can see the results… I got a few walking shots but these were the best…
I also took some stills… The D90 is just awesome. I noticed that pictures are super punchy when it’s overcast. It was genuine fun!
Filed under: Photo/Video, tutorial | Tags: d90, fcp, final cut pro, nikon, stair stepping removal, workflow
Tutorial Numero UNO! I’ve had the D90 for quite some time, actually ever since it came out. It’s been treating me very well. As a still cam its absolutely amazing. And with addition of some strobist gear and knowledge you have to work hard at making the picture bad. The video on the other hand, is the opposite. Lots of work for good video. But if you use the info on the net about using the D-movie mode properly you will get good results. I’m writing this tutorial so that maybe it will help some with the workflow. I’ve been trying to find the best way of transcoding, editing and exporting for quite some time and with lots of headaches. But I feel that I found a good solution. If this is totally “no-duhhh!” for ya, then have a cup of coffee or go have fun shooting some video, just don’t yell at me… heheh…
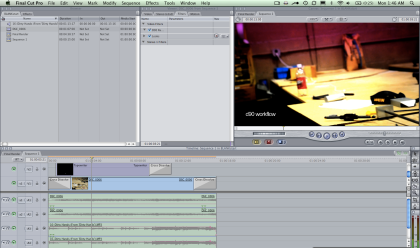
For the others, like me, here is the workflow:
1. Get files from the D90
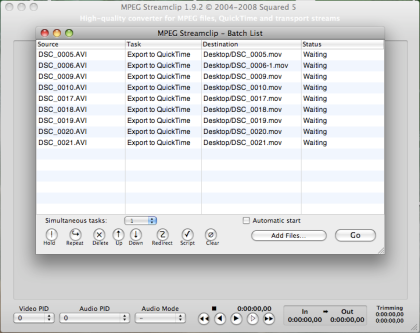
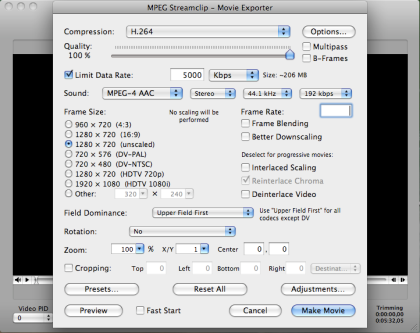
2. Export these files to Apple ProRes 422 (you need Final Cut Pro 6 for that codec) USING the MPEG Streamclip You can do a batch export from MPEG Streamclip… SWEEEET! Just press command-B or go to menu LIST>BATCH LIST. Add the clips and choose EXPORT TO QUICKTIME.
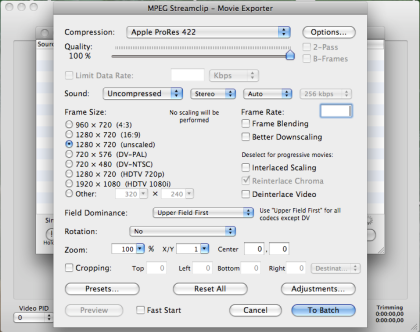
These are the settings for PRORES422
3. Install TOO MUCH TOO SOON D90 Rescaler courtesy of Mattias and Lee Wilson
4. FireUP! Final Cut Pro
5. Import your clips, Drag the clip into the timeline, Do your edit, Double click on the clip you want to remove the stairstepping in the timeline and it will open in the clip viewer
6. From Effects Tab go to VIDEO FILTERS>TMTS Video and drag the D90 Rescaler onto that clip in the viewer or in the timeline. That’s it. Its done. BAMM! It should now show up in the Filters tab on that viewer of that clip just so you can make sure it’s there.
7. Export the video. FILE > EXPORT > EXPORT TO QT choose ProRes again. DONE…
8. If you want to save the video for Vimeo or YouTube, Use the MPEG Streamclip to convert that file into H264.
9. Go and get yourself a good pecan pie for all the hard work you’ve just done! Or whatever other thing you like to do to celebrate… who knows! Watch the tutorial for specifics…
Let me know if you have a better way of doing this!
Filed under: Photo/Video | Tags: d90, diy, merlin, nikon, stabilizer, steadicam, traxxas
DIY Steadicam
I’ve been working on a camera rig for my Nikon D90. This design is based on the Merlin Steadicam, but since I don’t have 800 bucks to dish out on something that should cost 150 max (I’d rather get that 70-200mm zoom – “the bazooka”), I managed to do it for 12 bucks. Yes I had a lot of freebies (like the bearings and the aluminum)
I have to give credit to WSCLATER from diycamera.com for the design and the brilliant idea of using a universal joint usually found in radio controlled toy cars and trucks. He has been a great help and has lots of goodies on his site, so make sure you check it out!
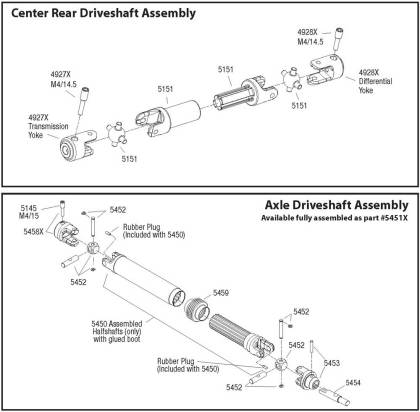
I’m using the the TRAXXAS driveshaft for the joint and skateboard wheel bearings.

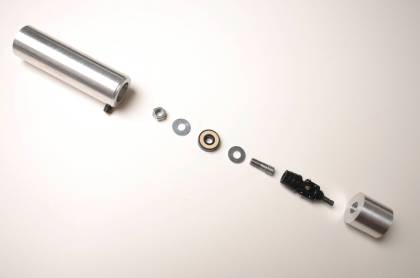
I’ve been able to use my school’s shop to machine all the parts to make the joint fit into a handle and into the camera plate.
As you can see from the above picture, I turned a handle from aluminum round stock on a lathe. Put a set screw on the side of it so that when the ball bearing/traxxas joint assembly is put in, it can be secured. From left to right we have:
-the handle 1.5″ aluminum handle (milled from raw aluminum round strock)
– nut, washer, skateboard ball bearing, washer that all go on a threaded piece 1/4 20 bolt that I cut off to the right size. I had to file the bolt so that it was smaller so that the ball bearing would fit, and then thread the end of it (left end) so that the nut could be used to tighten the ball bearing. The other end of the bolt screws into the traxxas joint that I had to cut to the right size and thread. The other end (right) of the traxxas joint was threaded so that it could screw into another piece of aluminum round stock that then attached to the bottom plate of the rig.
– The plate is made of two parts. The bottom part, with the slit, is 1/4 inch aluminum that’s been milled so the slit can be used as a sliding adjustment for the forward/backward tuning of the rig. I then used four bolts that screw into another, 3 inch aluminum c-channel. I used spacers to offset the two plates. I guess you can use washers for that or get some spacers at your hardware store. WSCLATER has this kind of design that I appropriated. The c-channel has been cut in front into a triangle shape and bent so that it could receive the bent arm. The connection between the top plate and the bent arm could be made more elegantly, but I found it was very sturdy so I just left it alone.
– The arm is made of .5″ (I think) aluminum tube with a very thin wall. It is bent according to a very particular, scientifically calculated shape… ahh… NO, that’s not true, is it? I just sketched a shape that looked “right” and bent the tubing to that shape. The arm has a hole drilled in the front so that a forward weight can be attached. I just drilled a hole and used a carriage bolt to attach the weights. You can use washers as weights although they get expensive so I just used steel round stock that I had in the shop. The bottom of the tube is using the leftover traxxas shaft that I cut off. It is jammed into the tubing (fit almost perfectly) so that a bolt can be screwed into the end of the bent arm and the bottom weight can be attached.
To finish off the rig, I attached a Boghen sliding quick release plate to the top aluminum plate. This allows me to nicely attach the camera but most importantly it allows me to tune the rig so it stays balanced sideways. Look at this video to see what I’m talking about.
Balancing is crucial ! The right position of the camera, the right weight is very important. Start out with the bottom weight. Add just enough weight so that when you perform the “drop test” (look it up on merlin site) the camera rig should swing back from horizontal to vertical in about 1 second. Watch the quick start guide on youtube *it’s kinda funny* also you can download the merlin manual for more info. If you have TOO much weight on the bottom your rig will sway as you move it from side to side, when that weight is just right, there will be no swaying.
I hope this kind of explains the build. As you can see most of these parts are machined from scratch, except the joint, ball bearing, bolts, and the quick release plate… sorry, there really isn’t a list of off the shelf parts.
Here is the test… [blog]
Here are some pictures…
Filed under: Uncategorized
I suppose it’s the first blog! As with all first things it’s hard to decide what to start with.
I recently finished my Master’s of Architecture degree… and, on the contrary, have been playing around with photography and videography to take my mind off of the long thesis.
I suppose I’ll be writing about these in the upcoming posts.


